The Anatomy of a Perfect Kitchen Renovation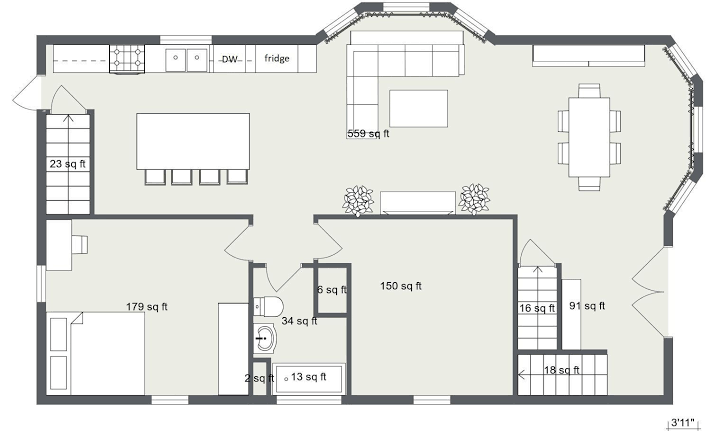
Renovating a kitchen is easily one of the most rewarding home projects you can take on, but let’s be honest: it’s also a logistical beast. If you don’t map out your steps carefully, you can quickly find yourself washing dishes in the bathroom sink for three months longer than you planned.
To survive the chaos and build a space that actually works, you have to look past the pretty finishes and focus on the mechanics of the room. Here is the ultimate blueprint to taking your kitchen from a frustrating bottleneck to the true centerpiece of your home.
1. Nail the Flow Before the Finishes
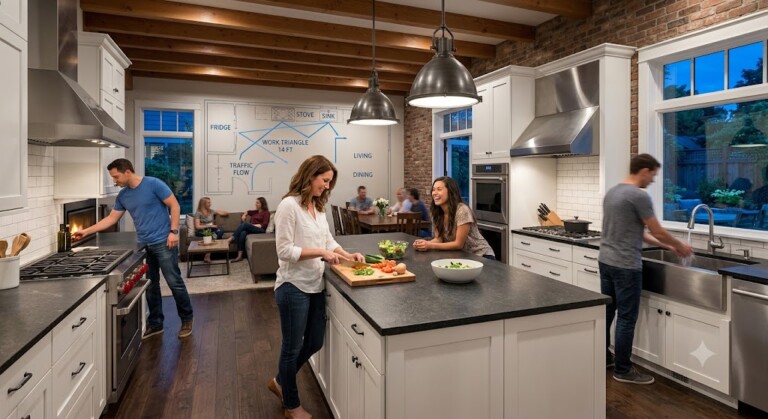
A beautiful kitchen is completely useless if you can’t easily open the fridge while someone is standing at the stove. The gold standard of layout design is the “Work Triangle”—the invisible lines connecting your refrigerator, sink, and cooktop.
Ideally, the sum of these three legs should stay between 10 and 26 feet. Keep your high-traffic zones clear. For example, if you are designing an open-concept space, place your main prep area where you can stay connected to the dining and living spaces without isolating the cook.
2. The Step-by-Step Execution Plan
The secret to a smooth remodel is doing things in the exact right order. Knocking down walls before your new cabinets are even ordered is a recipe for an indefinitely unlivable house.
1.Planning & Sourcing:Weeks 1-4.
Finalize your layout, lock in your budget, and order your cabinets and appliances first. Appliance lead times can fluctuate wildly, and cabinet boxes dictate the rest of your measurements.
2.Demolition & Framing:Week 5.
Tear out the old space safely. If you are tearing down walls to create an open floor plan, ensure structural supports or beams are installed to handle the load.
3.Rough-In Plumbing & Electrical:Weeks 6-7.
Run the internal mechanicals while the walls are open. Now is the time to add extra outlets to your kitchen island, run gas lines for a premium range, and position task lighting directly over prep surfaces.
4.Drywall, Paint, & Flooring:Week 8.
Close up the walls, prime, and apply your base paint coats. Lay down your flooring before the heavy elements arrive so the material extends cleanly beneath your cabinetry.
5.Cabinetry & Countertop Templates:Weeks 9-10.
Install the base and wall cabinet boxes. Once they are perfectly level, the stone fabricator will come out to take laser templates for your countertops.
6.Countertops, Backsplash, & Fixtures:Weeks 11-12.
Drop in the stone counters, hook up the sink, tile the backsplash, and install the final trim pieces. Bring the electrician back to wire up your pendant lights and appliances.
3. Where to Splurge vs. Where to Save
When budgeting, it’s easy to overspend on items that don’t actually offer a high return on investment (ROI) or long-term durability.
| Splurge Here | Save Here |
| Cabinet Hardware & Drawer Glides: You touch these dozens of times a day. Cheap runners fail under heavy pot storage, while soft-close mechanisms keep the space premium. | The Backsplash: You don’t need a high-end tile to look expensive. A classic, affordable ceramic subway tile laid in an elegant herringbone pattern looks stunning for a fraction of the cost. |
| High-Use Appliances: Put your money toward a high-performance stove/oven and a ultra-quiet dishwasher. | Lighting Fixtures: Pendant lights are essentially ceiling jewelry. You can find incredibly stylish, designer-inspired fixtures online without paying luxury showroom prices. |
| Solid Work Surfaces: Quartz or engineered stone counters handle heat, scratches, and stains without the constant sealing required by high-maintenance marble. | Cabinet Boxes: Opt for standard, modular cabinet boxes to save on custom build costs, then upgrade to custom or semi-custom door fronts for a tailored look. |
Pro Tip on Storage: Don’t just stick to standard lower cabinets with doors. Deep drawers are a complete game-changer for lower storage. They let you lift heavy cast-iron pans straight up, rather than forcing you to drop to your knees to hunt through the back of a dark cabinet shelf.


0 Comments